
Install Your Alpine KTA-450 4 Channel Amplifier
Here is a simple and easy breakdown of how to install you new Alpine KTA-450 4 Channel Amplifier!
Step 1
Check the packaging and make sure it hasn't been damaged during shipping; then check to make sure that you received all the parts you will need for your install:
- (1) KTA-450 Amplifier
- (1) Set of Universal Mounting Brackets
- (1) Plug and Play Speaker Wire Harness
- (3) 3 Meter RCA cables (Pre-bundled)
- (1) Red Power wire with inline fuse
- (1) Black Ground Wire
- (1) Black Flex Tube
- (4) Pieces of Velcro
- (1 each) Male & Female Bullet Connector
- Extra fuses
Tools Needed:
- 10mm socket
- 12mm wrench or socket (Secure power wire to positive (+) battery terminal)
- 14mm wrench or socket (Remove passenger seat bolts)
- Utility knife
- Wire fish or coat hanger
- Electrical tape
- Side cutter
- Zip Ties
Step 2
Make access to the back of your aftermarket head unit.
Step 3
Remove the plastic covers on the feet of the passenger seat to reveal the four 14mm bolts. There are 2 bolt on the front and 2 bolt on the rear of the seat. Remove the four bolt and lean the passenger seat backwards into the back seat to gain access to the area under the seat.
Step 4
Place the Alpine KTA-450 amplifier under the passenger seat. You may use the provides velcro or the universal brackets to mount it to the carpet or floor. Do not permanently mount until all wires have been connected.
Step 5
Connect the provided set of RCA's to the RCA connections for Front & Rear on the back of the head unit. The RCA's are labeled: Front Left (FL), Front Right (FR), Rear Left (RL) and Rear Right (RR) on both ends.
Step 6
Route the RCA's down the inside of the passenger side of the dash towards the passenger floor board. Continue around and behind the top of the floor carpet towards the bottom of the A pillar.
Step 7
Remove the door sill trim by lifting straight up.
Step 8
Remove the kick panel by removing the button retainer and pulling outward on the kick panel to release the clips.
Step 9
Continue running the RCA bundle through the factory wiring channel until you reach the area under the passenger seat. The wire channel clips can be opened with a small flat head screw driver to release the tab and the top will lift open.
Step 10
Run the RCA's under the carpet and through the opening in the carpet near the floor vents. Connect the RCA's to the RCA's on the Alpine Plug & Play Harness.
- White = Front Left
- Grey = Front Right
- Green = Rear Left
- Purple = Rear Right
Step 11
Connect the Alpine harness to the amplifier. Line up the locating pin and push in till the plug is fully seated.
Step 12
Route the large blue wire with the plug & play "T" harness back along the same route as you ran the RCA's back up to behind the radio.
Step 13
If you have a 2014-2019 vehicle you will have 3 harness connections. Find the corresponding connections between your vehicle and the radio harness.
-The Male 10 pin connector will plug into your radio harness.
-The Female 10 pin connector will plug into the 10 pin plug coming from your vehicle.
- Connect the Female 6 pin connector with the Green and Purple wires to the Male 6 pin connector from your vehicle.
- Use the provided bullet connectors to connect the solid blue (Remote Turn On) wire to your aftermarket radio harnesses remote turn on wire. If you have the Maestro harness this wire is labeled for you.
If you have a 2020 or newer vehicle, you will have 1 connector on the end of your large blue speaker wire bundle.
- Connect the female 10 pin connector from our harness to the 10 pin connector coming from your vehicle.
- You will no longer need to use the black 10 pin connector from the Maestro wiring harness.
Step 14
Connect the provided Black ground wire to the black ground wire on the amplifier harness.
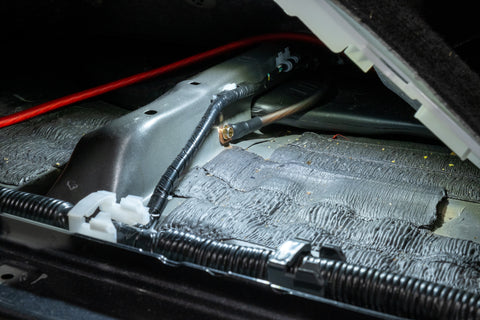
Step 15
Route the provided ground wire under the carpet and ground to the floor pan using the provided 10mm bolt. You will see a pre-thread hole in the floor pan or a wiring harness that is already ground to a pre-threaded hole.
See example below:
Step 16
Open the hood and locate the main firewall grommet on the passenger side of the vehicle.
- Locate a spot to cut an "X" in the grommet using a utility knife. Keep in mind that many Toyota firewall grommets have an exterior and interior membrane that you will need to cut through. Take extra care to not damage any other vehicle wiring when cutting your "X."
Step 17
You may choose to use a wire fish or metal coat hanger to assist in passing the power wire from the interior to the engine bay.
- Pass the bullet connector end of the Red power wire through the firewall grommet and towards the amplifier using the same wiring chase as in the previous steps.
Our recommendation is to run the power wire along the firewall and down the inside of the drivers side fender towards the battery.
Use the provided zip ties to secure the wires so that they are free of moving or hot engine components.
Step 18
Connect the provided power and ground wires to the amplifier harness using the pre-connect bullet connectors.
Step 19
Connect the power to the positive battery terminal.
Step 20
Power on your vehicle and test the audio settings to ensure that your radio and amplifier are working.
- If you have head unit powers on but you have no sound, check to make sure that you connected the remote turn on wire.
Step 21
Setting the gains on your new Alpine KTA-450 amplifier.
- Find a song that will play for at least a few minutes.
- Turn up the volume on your head unit to about 75% of the MAX volume.
- Using a small flathead screwdriver adjust the Front Gain until your desired sound level is reached.
-Repeat the same for the Rear Gain setting.
This will set the overall sound level for your vehicle. You can further adjust to your liking using the EQ settings within your head unit.
Step 22
Once you have confirmed that your system is working and you have set the gains to your liking, reassemble your vehicle and enjoy your new amplified system!


