
Experience High-Quality Sound with the Alpine 6 Speaker Plug & Play Bundle from Trail Grid Pro.
This installation guide is applicable for the 6x9" and 8" front door speaker options
Installation Video:
Tools needed:
- 10mm socket
- 3/8th inch socket
- Ratchet wrench
- 10mm wrench with pivot end (preferred)
- 1/4 inch wrench
- Phillips head screw driver
- Small flathead screwdriver
- Panel removal tool
- Zip ties
- Cutters
Step 1
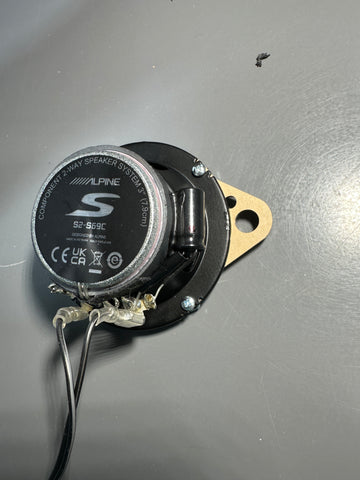
Setting up your new Alpine 2.75 inch speakers:
- For this step you will need the 2.75 inch speakers, speaker mounting brackets and the provided #4 nuts and bolts.
- Place the 2.75 inch speaker bracket on the top of the Alpine speaker (see below)

- The capacitor should be towards one of the mounting tabs.

- Place the provided bolt up through the mounting location in the speaker and through the mounting bracket, secure with the provided nut.
- Once you have all four nuts and bolts started, snug them down using a phillips head screwdriver and a 1/4 inch wrench.
- DO NOT OVER TIGHTEN!
- Using the speaker wire adapters labeled "Dash," connect the 1/8th and 1/4 inch spade connectors to the prongs on the speaker.
- Repeat the process for setting up the other 2.75 inch speaker.
Step 2
Removing the dash speaker:
- Use a panel removal tool or pry tool to lift up on the dash speaker grille.
- Begin by prying up on the back of the speaker grille nearest the front seat.
- Slowly work your way around releasing the retaining tabs.
- Lift the grille up and back towards yourself to fully remove.
- Use a 10mm wrench to remove the two factory 10mm bolts that secure the dash speaker. Set these to the side as you will be reusing them in a minute.
- Disconnect the factory speaker wire by depressing the tab.
Step 3
Installing your new dash speaker:
- Connect the speaker adapter harness to the factory speaker wire.
- Insert the speaker assembly into the dash.

- The speaker mounting bracket will line up with the factory mounting locations.
- Use the factory 10mm bolts to secure the speaker assembly.
- DO NOT OVER TIGHTEN!
- Replace the speaker grille by inserting the side closest to the windshield and pushing the retainers back into place.
Repeat steps 2 & 3 to install the other dash speaker.
Step 4
Removing the speakers in the front door:
- Remove the sail panel near the side mirror by pulling straight back.
- The small white clip may stay in the door, you can remove it with your fingers and place it back on the sail panel.
- Remove the push pin retainer just below the sail panel.
- Depress the center pin until you hear a click, than remove the entire retainer with a panel tool.
- Remove the cover panel behind the door handle.
- Using a panel tool, insert near the door lock switch and gently pry out.
- Once the panel is removed, remove the phillips head screw.
- Remove the insert in the grab handle and remove the phillips head screw at the bottom of the grab handle.
- Lift up on the window switch panel to remove.
- Disconnect the window switch connector by depressing the tab and sliding the connector back.
- Release the retaining pins around the door panel by pulling straight back on the door panel.
- After the door panel is fully removed make sure that you remove any retainers that may still be stuck in the door ad replace them on the door panel.
- Remove the door cables by lifting the white and green retainers out of their slots. Swivel the cable until the ball releases from the holder.
Removing the 6x9 woofer:
- Disconnect the speaker wire by depressing the tab.
- Use either a 10mm socket or phillips head screwdriver to remove the four bolts securing the speaker. We will not be reusing the factory bolts for installation.
- Lift the speakers out of the door panel.
Step 5
Installing the front door speakers:
- Installing the 6x9 speaker into the door.
- Use the provided 6x9 speaker mounting bracket and the provided bolts to mount the bracket to the door.
- On one side of the bracket you will note a hump, this should face up towards the top of the door.
- Line up the four mounting locations and start the provided 3/8 inch head screws by hand. Once you have all four started, tighten them with a 3/8th inch socket. DO NOT OVER TIGHTEN!
- Connect the speaker wire adapter (labeled door) to the speaker.
- Connect the 1/8th and 1/4 inch spade connectors to the prongs on the speaker.
- Connect the speaker wire adapter to the factory speaker wire plug.
- Route the wire through the slots on the bracket and place the 6x9 speaker into the bracket.
- Use four of the provided phillips head screws to secure the speaker to the bracket.
- Pro tip: Protect the speaker with your hand when securing the phillips head screws. Damage to the speaker from installation is not covered under manufacturers warranty.
Step 6
Re-installing the door panel:
- Replace the door cables.
- The green connector goes on the bottom. Insert the ball in the holder, swivel and reattach the green connector into the slot.
- The white connector goes on the top. Insert the ball in the holder, swivel and reattach the green connector into the slot.
- Hang the door panel on the window edge.
- Make sure that the main window switch harness is accessible in the opening in the door where with window switch attaches.
- Once the panel is in place, press around the edges of the door panel to re-secure the retaining pins.
- Replace the sail panel by pressing it into place.
- Replace the pin retainer below the sail panel.
- Push the center pin out, place the retainer in the door and press the center pin to where it is flush with the retainer.
- Replace the smaller phillips head screw behind the door handle.
- Reinstall the cover plate behind the door handle by pushing into place.
- Replace the larger phillips head screw into the grab handle and replace the insert.
- Reconnect the window switch harness to the window switch panel. Press the window switch panel into place.
Repeat Steps 4, 5 & 6 for the other front door.
Step 7
Removing the speakers in the rear door:
- Remove the trim panel near the outside of the door by pulling straight back.
- The small white clip may stay in the door, you can remove it with your fingers and place it back on the trim panel.
- Remove the push pin retainer just below the trim panel.
- Depress the center pin until you hear a click, than remove the entire retainer with a panel tool.
- Remove the cover panel behind the door handle.
- Using a panel tool, insert near the door lock switch and gently pry out.
- Once the panel is removed, remove the phillips head screw.
- Remove the insert in the grab handle and remove the phillips head screw at the bottom of the grab handle.
- Release the retaining pins around the door panel by pulling straight back on the door panel.
- After the door panel is fully removed make sure that you remove any retainers that may still be stuck in the door ad replace them on the door panel.
- Remove the door cables by lifting the white and green retainers out of their slots. Swivel the cable until the ball releases from the holder.
- Remove the window switch connector by depressing the tab.
Removing the 6.5 inch woofer:
- Disconnect the speaker wire by depressing the tab.
- Use either a 10mm socket or phillips head screwdriver to remove the three bolts securing the speaker. We will not be reusing the factory bolts for installation.
- Lift the speakers out of the door panel.
Step 8
Installing the rear door speakers:
- Installing the 6.5 inch speaker into the door.
- Use the provided 6.5 inch speaker mounting bracket and the provided bolts to mount the bracket to the door.
- Line up the three mounting locations and start the provided 3/8 inch head screws by hand. Once you have all four started, tighten them with a 3/8th inch socket. DO NOT OVER TIGHTEN!
- Connect the speaker wire adapter (labeled door) to the speaker.
- Connect the 1/8th and 1/4 inch spade connectors to the prongs on the speaker.
- Connect the speaker wire adapter to the factory speaker wire plug.
- Route the wire through the slots on the bracket and place the 6.5 inch speaker into the bracket. Center the speaker on the bracket with even margins around the speaker.
- Use four of the provided phillips head screws to secure the speaker to the bracket.
- Pro tip: Protect the speaker with your hand when securing the phillips head screws. Damage to the speaker from installation is not covered under manufacturers warranty.
Step 9
Re-installing the door panel:
- Connect the window switch connector.
- Replace the door cables.
- The green connector goes on the bottom. Insert the ball in the holder, swivel and reattach the green connector into the slot.
- The white connector goes on the top. Insert the ball in the holder, swivel and reattach the green connector into the slot.
- Hang the door panel on the window edge.
- Once the panel is in place, press around the edges of the door panel to re-secure the retaining pins.
- Replace the trim panel by pressing it into place.
- Replace the pin retainer below the trim panel.
- Push the center pin out, place the retainer in the door and press the center pin to where it is flush with the retainer.
- Replace the smaller phillips head screw behind the door handle.
- Reinstall the cover plate behind the door handle by pushing into place.
- Replace the larger phillips head screw into the grab handle and replace the insert.
Repeat Step 7, 8 & 9 for the other door.
Step 10
Test functionality:
- Power on your radio and enjoy your new Alpine 6 speaker audio upgrade!


