
This installation guide is intended to be used to assist you during the installation of your
2010-2013 Sony 9500ES 4Runner Plug and Play Bundle from Trail Grid Pro.
Installation Videos
Sony Bundle Installation Video

4Runner Microphone Install
Installing your bundle
1. The Body - Consists of the head unit and our custom wiring harness.
You're going to install this first.
- Make all your vehicle connections as noted in the document below. Shown below are the vehicle connectors you'll be using for your installation, which are the 4 or 6 factory looking connectors from the Maestro RR module.
- All the plugs are keyed plugs, which means they only fit their match on the Toyota side. All you're doing is matching plugs - it may look like a lot of wires but it's simple.
- Your bundle will arrive with the OBD harness attached to the back of your bundle. It will need to be plugged in to the OBD port under your steering column in order to retain your: backup camera functionality (if applicable), gauges (if applicable) and more! This is not shown in the video but you will need to complete this step before powering on your head unit.
- 2010-2013 (Non-Amplified/Backup Camera in Head Unit)
- 2010-2013 (Non-Amplified/No Backup Camera/Backup Camera in Mirror)
- 2010-2013 (Amplified/Backup Camera In Head Unit)
You Will Be Connecting:
6 Connectors From The Maestro Harness

USB/AUX Port Adapter
OBD2 Plug
Navigation Antenna
Sony Microphone
AM/FM Radio Adapter (If Required)
4 Connectors From The Maestro Harness

USB/AUX Port Adapter
OBD2 Plug
Navigation Antenna
Sony Microphone
AM/FM Radio Adapter (If Required)
Sirius XM Tuner (If Selected)
2010-2013 (Amplified/Backup Camera In Head Unit)he Maestro RR may need to be re-flashed with your specific vehicle parameters. To re-flash the module, the module will need to be removed from the vehicle and connected to a computer. Visit idatalink Maestro’s website and click on the green button at the top right of the screen labeled “Flash My Module.”You Will Be Connecting:
6 Connectors From The Maestro Harness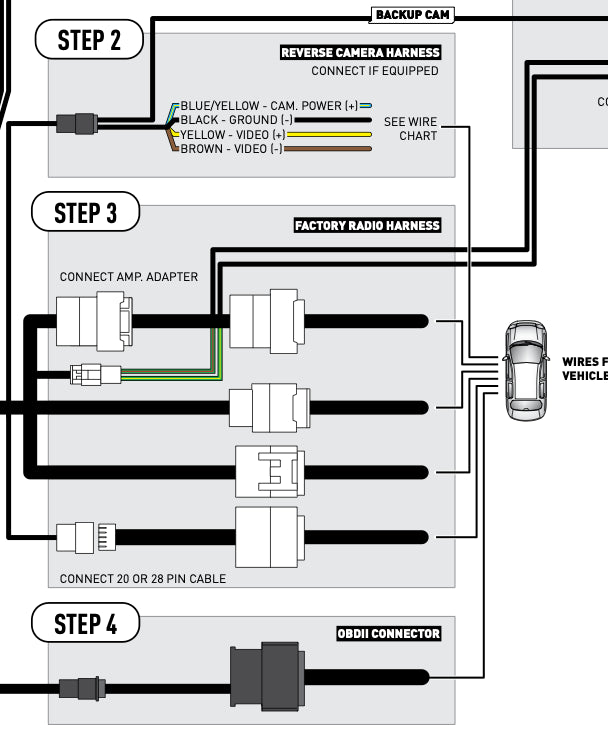
USB/AUX Port Adapter
OBD2 Plug
Navigation Antenna
Sony Microphone
AM/FM Radio Adapter (If Required)
Sirius XM Tuner (If Selected)
- DO NOT POWER ON YOUR HEAD-UNIT BEFORE ALL CONNECTIONS ARE MADE. This will cause an error when the Maestro module is trying to calibrate to your vehicle.
More Install Tips Regarding The Components Of Your Sony Bundle
- Backup Camera Harness
- AM/FM Antenna Adapter
- USB Retention Cable
- Sony Microphone
- Sirius/XM Retention
The backup camera is apart of the Maestro RR harness, so the rear camera wire will already be plugged into the rear camera RCA.
Your bundle will come equipped with a antenna adapter that will be plugged into the lower left hand corner of the rear of the chassis. Please make sure you plug in the factory antenna plug into our antenna adapter.
If you have a 2010 – 2012 4Runner, in some cases you won’t have the item I’ve described above as your factory antenna cable is already circular (doesn’t require an antenna adapter) and simply plugs directly into the back of the Sony radio.
2010 – 2013 4Runner:
If your USB connection is in your glove box, included is a kit to create a front facing USB. By removing one of the button blanks or the existing AUX port, you will be able to use the provided USB/AUX adapter to add a front facing USB.
2012 – 2019 4Runner:
If your factory USB location is underneath your head unit included in your kit is a USB retention adapter.
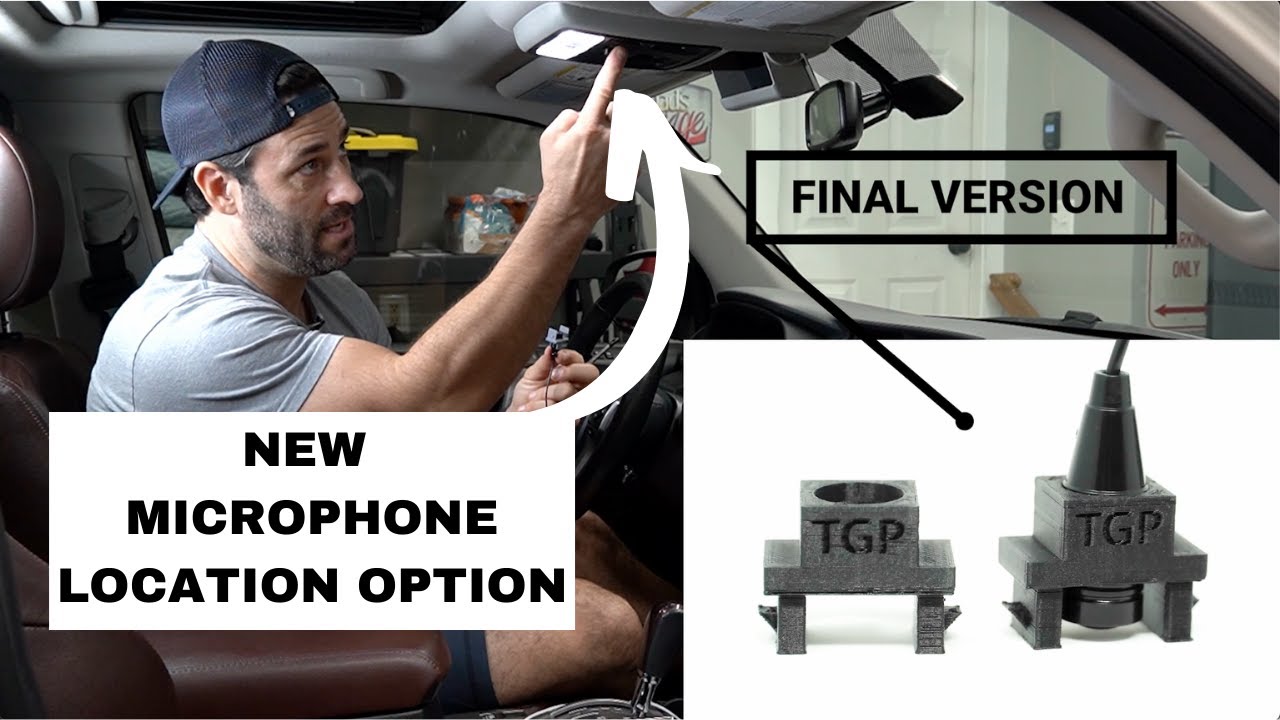
You will need to use the provided Sony microphone with our bundle. You will need to run the wire and plug into Red port labeled “MIC”
In your kit is our Sony Microphone Mount, which allows you to mount the Sony microphone in your factory location.
Sony Microphone Mount Supporting Documentation
We are proud to offer you a solution for mounting your Sony aftermarket microphone in your 2010+ 4Runner’s factory microphone location.
This allows your new microphone to be neatly tucked away in the headliner console and maintains the level of voice clarity and function you expect.
Installation Steps
-
Remove Headliner Console. Depending on trim level this may vary slightly.
– If you have a sunglasses compartment, flip open the compartment and remove the 2 screws.
OR
– If you have terrain setting knobs (i.e., TRD Pro, Off Road, etc.), pull down/off the control panel which will reveal the 2 screws.
– Front of headliner console is typically held in with pressure clips and can be removed by pulling straight down. - Remove Headliner Console Wiring Harness. Unplug harness connector.
- Remove Factory Microphone. Locate microphone (black rectangle) and pull toward the back of headliner console. Unplug the factory microphone.
- Remove Mounting Ball On Sony Microphone. The small ball can be removed easily by cutting with a pair of side cutters or a utility knife.
- Install Microphone To Mount. Push the rounded end of the microphone thru upper support of the mount. The rounded end of microphone should be very close to in line with the bottom of the 2 legs on mount. Align the spot where you cut off the ball to be in-line with one of the upper supports. This will make sure the audio openings on the side of the microphone are not obstructed.
- Install Sony Microphone Mount. Install mount into headliner console. Insert mount (legs & rounded end of microphone facing down) until the clip locks into place.
- Route Microphone Wire. Start by routing microphone wire from headliner console area through headliner towards rearview mirror. At this point, you can re-install the headliner console. Be sure to pull excess slack toward the rearview mirror while reinstalling headliner console. Continue routing the wire along the top of the windshield toward the driver side A pillar. Tuck the wire behind the A pillar cover and route down the A pillar toward the driver’s floorboard. Run the wire under the dash area and finish by routing the 3.5mm jack to the back of your new Sony Bundle. Connect the 3.5mm jack into the red mic port on the rear of the Sony radio chassis.
- Test Functionality. Test functionality after making all required connections.
2010 – 2013: If you selected “Maintain Sirius/XM” at checkout, you’ll receive the STO2.
Maestro STO2: This will already be attached to your new Sirius/XM tuner. The tuner is located underneath the rear chassis of the Sony radio.
Utilize the factory satellite antenna cable that was plugged in to the back of your factory radio to plug into the provided adapter.
You will not use the antenna from the SXV300 (which is located in your parts bag) since the STO2 will maintain your factory satellite antenna.
Inside the dash you may find several square plugs of varying colors (i.e. white, gray or black).
- White – Factory Navigation (No longer needed)
- Gray or Black – Factory Sirius XM Antenna
- Connect your XM tuner adapter to either the gray or black plug.
2. The Dash Kit - Your New Silver or Charcoal Metra 4Runner Dash Cover.
You're going to install this second.
- Transfer your vents, trim pieces, and install the hazard button trim to the dash kit just like in the video below.
- Small white clips: Please use the small white tab clips provided with our bundle to attach to the four tabs on the back of our dash kit. They are more robust than the factory clips and hold our bundle more securely.
- Make sure to connect the hazard button wire before installing the dash kit into your dash, over the body of the bundle.
3. The 9500ES Screen
You’re going to install this last.
- Attach/slide the Sony 9500ES screen into the body.
- After placing the Sony 9500ES screen into the body, but before securing the screws in place, test all the functions of the radio before proceeding.
- After you confirmed that the unit functions correctly, screw in the provided 4 silver screws, securing the Sony 9500 screen to the body (2 on each side of the neck of the Sony 9500ES). For this step, we recommend you use a magnetic tip Phillips-head screwdriver if you have it, as the two outside screws are set down further than the other two.
- Slide the small black cover on the neck of the Sony 9500ES toward you to line up the final screw location.
- Screw in the one black screw (in the middle of the neck of the Sony 9500ES).
- You have completed installation of your new Sony Bundle! Congratulations!
- Android Auto
- Maestro RR Module Reset
Download the Android Auto app from the GooglePlay. If you’re experiencing issues with Android Auto, here is a decent video that walks you through some troubleshooting of Android Auto. The head unit shown in this video is not a Sony, so just focus on the general troubleshooting aspects.


